

How To Screenshot A Certain Area On Windows 10
It's common to want to take a screenshot on a PC. If yous're not using a third-party tool, you lot can do it manually. The nearly obvious manner is to Hit the Prt Sc push button/or Impress Scrn button (impress screen key), which will take hold of the entire PC screen. Y'all do this when using Windows Os and printing the Print Screen central (located in the height right of the keyboard) to have a total PC screenshot and re-create the screen's epitome to the clipboard or relieve it in the screenshots binder.
But there are more screen capture methods of taking screenshots on Windows.
This article will cover how to screenshot Windows x and all the steps you demand to carry out. We'll also respond some critical questions that most users enquire:
- How do you accept screenshots on Windows ten: full or minimized computer screen?
- How do I speedily take a screenshot on a PC?
- Taking screenshots and recordings on Windows using the Xbox game bar
In the FAQ, we as well show you how to take a screenshot on Windows 11.
Windows ten has many means to achieve this, exist it taking a screenshot of the entire screen, a detail window, or a role of the screen. Let's take a await at them ane past one.
How to screenshot on Windows 10: easy tricks
The following methods prove you lot how to screenshot on windows to capture full or minimized screenshots:
- Print screen key to take a minimized or full-screen capture screenshot
- Apply the game bar to grab the computer screen: full or minimized screenshot on Windows operating system
- Alt + Prt Sc (print screen push button) screen capture
- Windows + Print Screen screen capture
- Apply the Snipping Tool app to take a screenshot on Windows
- Using the Snip & Sketch app to accept a screenshot
- Utilize a third-party app or epitome editor to capture screenshots on PC
Method i. Use the Print Screen central/shortcut
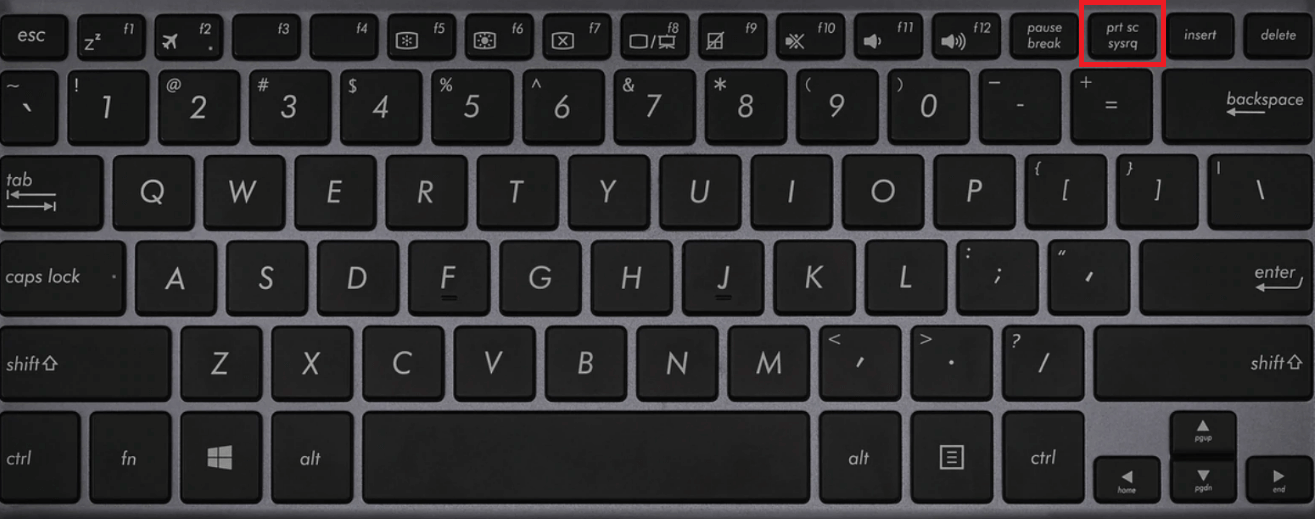
The easiest manner to take a PC/computer screenshot on Windows 10 is the Print Screen key (Prtscn). This button is usually located at the tiptop row of the keyboard, well-nigh the Function (F#) keys. To capture your entire screen and automatically save the screenshot,tap the Windows key + Print Screen key. Your screen volition briefly go dim to indicate that you've but taken a screenshot, and the screenshot will exist saved to the Pictures > Screenshots binder. Let's await at this in detail beneath:
To capture your unabridged screenshot on Windows, simply:
- Press PrtScn on the upper-right side of your keyboard to make the exact screen y'all desire to impress an active window
- You can have the PC screenshot through the keyboard, using the Prt Sc push/or Print Sc buttons. Hit the PrtScn button/ or Impress Scrn push button to take a total computer screen. The screenshot will exist automatically saved to your Clipboard.
- To save the file, paste the screenshot into any program that allows y'all to insert images, similar Microsoft Give-and-take or Microsoft Paint.
- Or, To capture your entire screen and automatically save the screenshot, tap the Windows central + Impress Screen key [windows primal print screen]. Your screen will briefly go dim to signal that you've just taken a screenshot.
- The screenshot will be automatically saved to the Pictures > Screenshots folder.
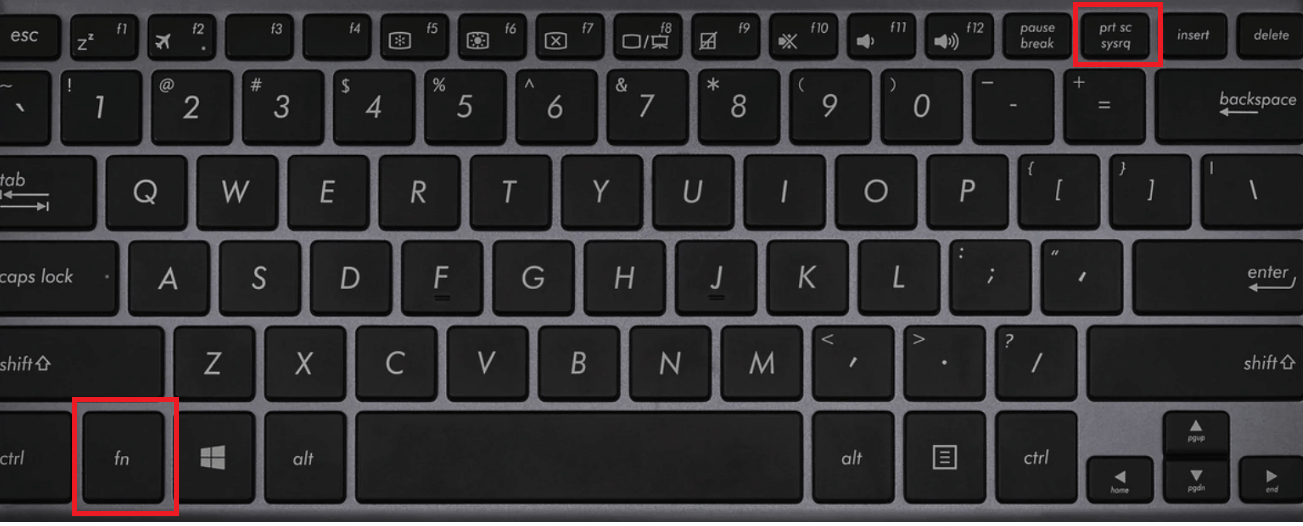
On some keyboards, you might need to press the Function (Fn) key and the Print Screen button to trigger the screen capture, i.e., Fn + PrtScn button/or Print Scrn (print screen)
The print screen primal will capture the entire screen and save it on the clipboard. Cheque the notifications on the lower right corner of your screen to see the saved screenshots.
Note:if y'all have more one display, it will be captured into a single image.
Past default, this method does non save the image as a file; rather, information technology copies it to the Clipboard . After doing so, you tin paste it (By pressing Ctrl+V or Right-Click > Paste ) onto a document (Like a Word or Google certificate) or an image processor (Like Microsoft Paint, or even Photoshop).
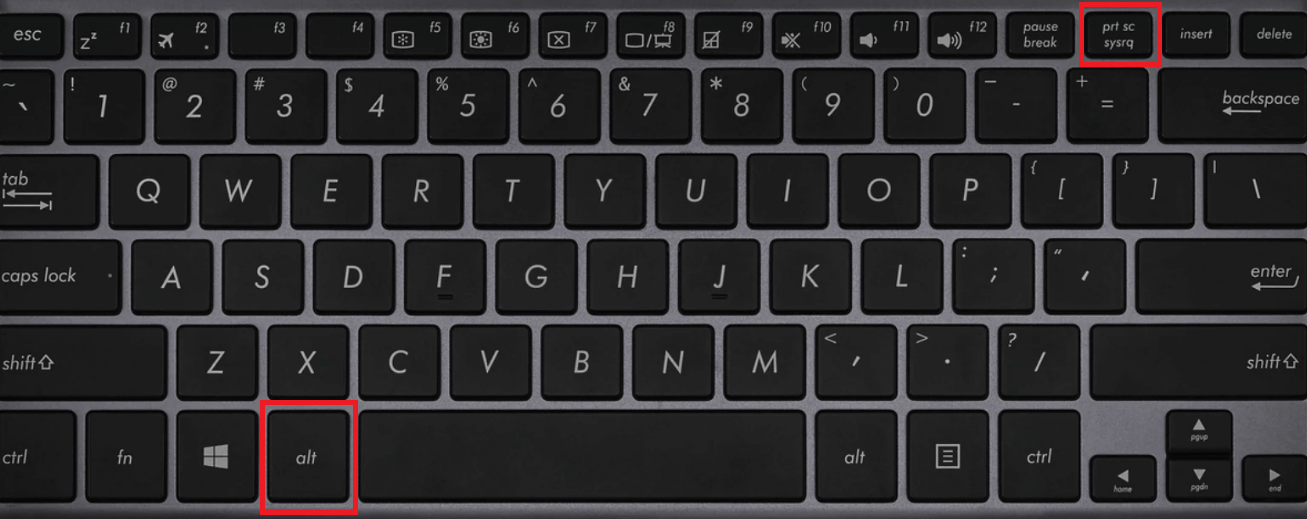
Method 2: Alt + Prt Sc (print screen push button) screen capture
- If you only want to capture a Single active Window , you can employ the keyboard shortcut Alt + Prt Sc (print screen).
- To accept the screenshot of the active window you want, and non just any window, y'all will need to select the said window past clicking on information technology first.
- Then printing Alt + Prt Sc (print screen button) or windows key print screen
- This volition re-create the prototype to the Clipboard, which you lot tin can retrieve by pasting it somewhere else.
If you lot want to save the image as a file, you lot can also do it with a keyboard shortcut.
- Simply printing the Windows cardinal (with the Windows logo ) + Prt Sc (print screen key). [Windows key print screen button]
- This saves the image as a file.
- By default it's located in C: Users<user proper noun>Pictures>Screenshots.
Method 3: Windows logo + Print Screen screen capture

- To accept a PC screenshot on Windows ten and automatically save the file, press the Windows central + Prt Sc (print screen)
- Your screen will go dim, and a screenshot of your unabridged screen volition salvage to the Pictures > Screenshots folder.
If you lot have bug with the Print Screen button not working properly, check How to Set up the Impress Screen Not Working on Windows x.
Method 4. Use the Snipping Tool to take a screenshot
The snipping tool is the all-time way to screenshot on Windows if you want to customize, comment, or share your screen captures. The Snipping Tool app is an fantabulous tool for taking screenshots. Information technology has been around since Windows Vista. You can use it to;
- Take a computer screenshot of the consummate screen,
- A rectangular role of the screen, or
- A free-course screenshot.
All the same, note that taking screenshots using a snipping tool does not automatically salve the screenshot as an image file, but it has the selection to practice so.
Hither're the steps to apply the snip and snipping tool to take a PC screenshot:
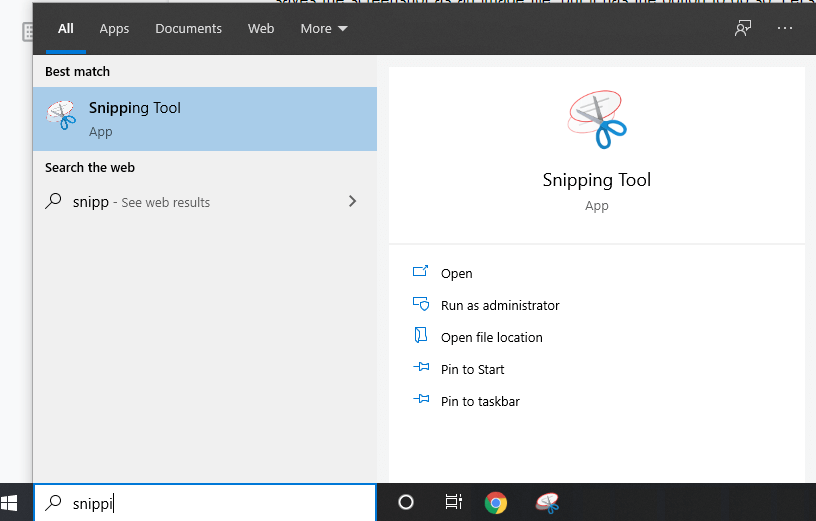
- To open the screen snipping tool app , you lot'll have to observe information technology through the search bar. If you don't see the search bar, you tin can right-click on the taskbar, hover to Search, and click on Show Search Box. A snip sketch tool agile window will pop upwardly.
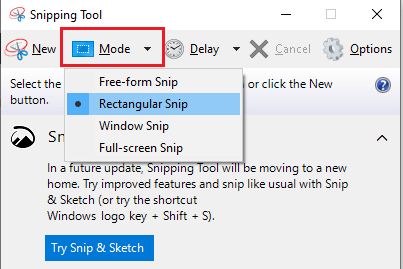
- A new window will pop up. Hither, select the Mode of the " snip " you lot want to take: a free-course snip, a rectangular snip, a window snip, or a full-screen capture . We volition show you how to take a rectangular screen snip.
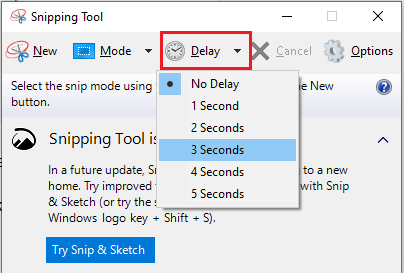
- The Snipping Tool also has the option to set a delay on taking a screenshot, allowing you lot to take screenshots subsequently a certain amount of time. This is helpful to capture pop-upwards menus and tooltips. Click on filibuster to set the time in seconds you will like to wait earlier taking the screenshot.
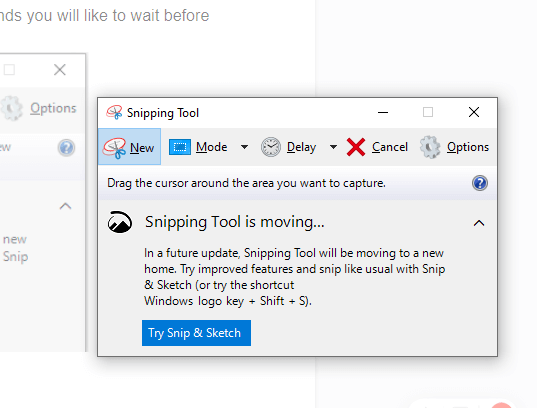
- Once y'all are set up to have the screenshot, click on New. The screen will fade out and the cursor volition turn into a cross. If you selected the delay option, the screen will fade later on the selected amount of seconds.
- If you lot selected the Rectangular screen snip mode you lot tin can click and drag to create a rectangle on the screen. The rectangle you create will exist the screenshot
- If you selected the Gratis-form snip y'all can click and draw the shape you want. Bear in mind that one time you have stopped pressing the right-click, the screenshot will be taken.
- If you selected the Window snip, you lot can click on the particular windows you want to take the screenshot of.
- Finally, if you click on the full-screen snip, the tool will take a total-screen screenshot of the whole screen.
One time y'all have taken the screenshot, you have many options to
-
-
- You lot can save the epitome as a file by clicking on File > Save every bit… and placing it at your desired location.
- Yous tin send it via email by clicking on File>Ship to > Email recipient or as an zipper to an electronic mail.
- You can print the screenshot by clicking on File > Impress.
- You tin copy the screenshot to your clipboard by clicking on Edit > Copy
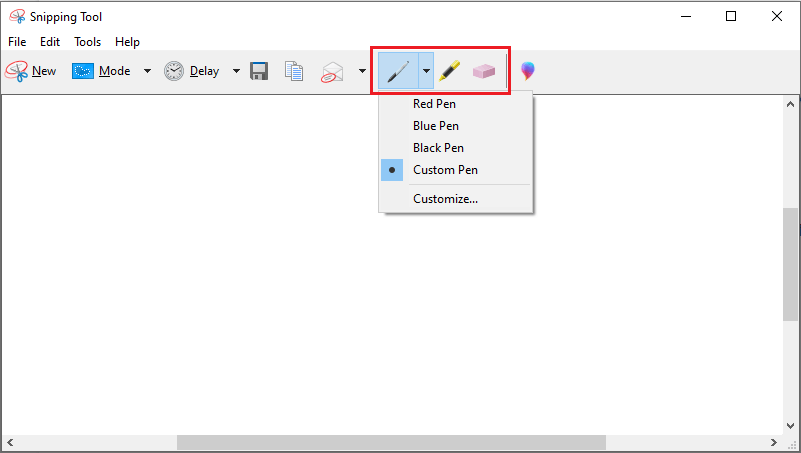
- You tin also edit the screenshot using the Pen or Highlighter function. Yous can customize the color of the pen. This is useful if you lot want to focus the attention of the screenshot to a item section.
-
Method v. Using the Snip & Sketch app to accept a screenshot.
The Snip & Sketch app (or snip sketch tool) replaced the Snipping Tool on Windows and is 1 of the drawing tools Windows users can employ. Snip & Sketch app is the best way to screenshot on Windows if you lot're looking to customize, comment, or share your screen captures.
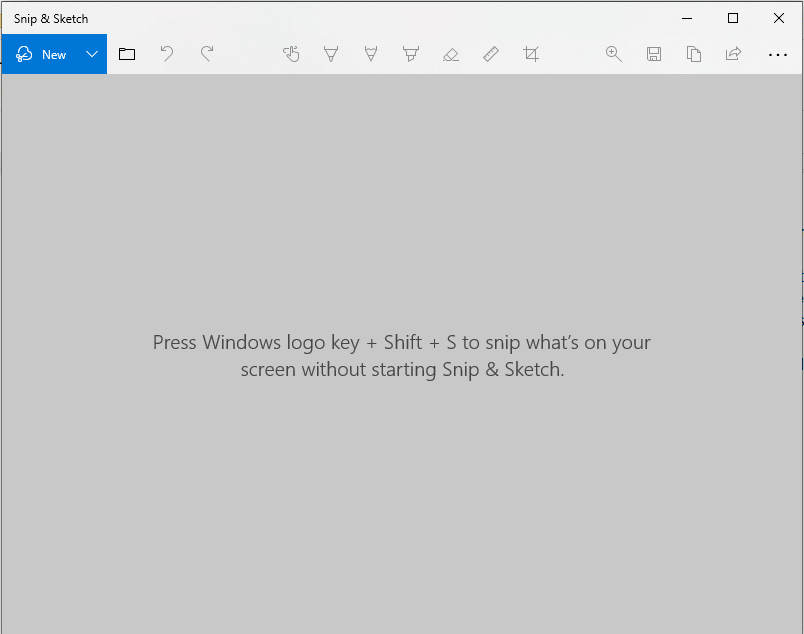
- To actuate Snip & Sketch, employ the keyboard shortcut Windows Key + Shift + S or search up Snip & Sketch app on the search bar.
- Your screen will dim and a mini carte du jour will announced at the tiptop of your screen, giving yous the selection to take a rectangular, free-form, window, or full reckoner screen capture.

- You can choose how yous'd like to grab a screenshot. These are the same options found in the Snipping Tool. They are from left to right:
- Rectangular PC screen Snip, Freeform Snip, Window Snip, and Total screen capture or Snip.
- Taking a screenshot hither will re-create information technology to your Clipboard.
- Y'all tin then paste it (By pressing Ctrl+V or Right-Click> Paste) onto a document (Like a Word or Google document) or an epitome processor (Like Paint, or even Photoshop).
- If y'all open Snip & Sketch window by looking information technology upward on the search bar a new window will appear.
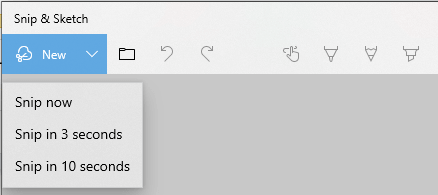
- In this window, you can click on New to start taking your screenshot or click on the arrow pointing downwards next to it to Snip in 3 or 10 seconds from so.
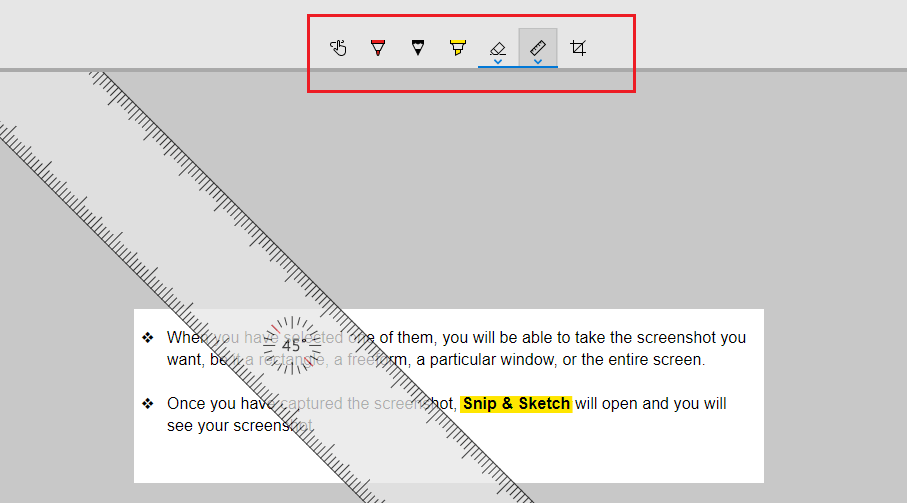
- After selecting one of the options the screen will darken and a toolbar will appear at the top of the screen. These are the same options constitute in the Snipping Tool. They are from left to right: Rectangular Snip, Freeform Snip, Window Snip, and total reckoner screen Snip.

- When you have selected ane of them, you will be able to take the screenshot yous want, be information technology a rectangle, a freeform, a particular window, or a full screen screenshot.
- Once you accept captured the screenshot, Snip & Sketch app volition open and you will run across your screenshot. Here yous tin can add annotations with a ballpoint pen, a pencil, or a highlighter. You can erase them using the eraser and you can likewise use a ruler (which yous can rotate past using the mouse wheel) to make the annotations in the angles you lot want. In that location is also the pick to ingather the screenshot.
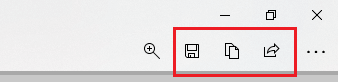
- At present that you've finished editing the prototype you lot can Salve, Re-create, or Share using the buttons at the meridian correct corner. Clicking on Save volition let yous cull where to save the image. Clicking on Copy will copy the image to your Clipboard and clicking on Share will let you share the prototype to your contacts via electronic mail or via other apps.
- In this window, you can click on New to start taking your screenshot or click on the arrow pointing downwards next to it to Snip in 3 or 10 seconds from so.
Summary: With the snip sketch tool, take a snapshot to copy words or images from all or parts of your PC screen or take screenshots on the windows operating system. Open up screen Snipping Tool to make changes or notes, then save, and share. You can capture any of the post-obit types of snips using the snip sketch tool:
| Free-form snip | Draw a complimentary-form shape around an object. |
| Rectangular snip | Drag the cursor around an object to grade a rectangle. |
| Window snip | Select a window, such equally a dialog box, that you desire to capture. |
| Full-screen snip | Capture the unabridged screen. |
Also, information technology's important to know that when you capture a snip, it'south automatically copied to the Snipping Tool window where yous brand changes, save, and share.
Note: The easiest style to telephone call up Snip & Sketch is with the keyboard shortcut Windows key + Shift +S. You tin also notice the Snip & Sketch tool listed in the alphabetical list of apps accessed from the Start push as well as in the notification panel on the lower right corner where it listed as Screen (full) snip. Or you tin simply search for it if you don't commit the keyboard shortcut to retention. (If you're a regular screenshot taker, we recommend pinning the app to the taskbar.)
Also, after you capture the screenshot, it volition be automatically saved to your clipboard and a preview notification will appear in the lower-correct corner of your screen (notification panel). Click on the preview notification to open the Snip & Sketch app and edit the screenshot with the available drawing tools before saving or sharing.
Method 6. Using the Game Bar to take a screenshot.
The last method we are going to review involves the use of the Game Bar for screen capture. The game bar in Windows x allows you to tape gameplay footage, record videos, and have screenshots, plus a number of other ones that we will not hash out in this article. You tin can take screenshots with the game bar fifty-fifty if you are not in a game. Let's find out how to apply it:
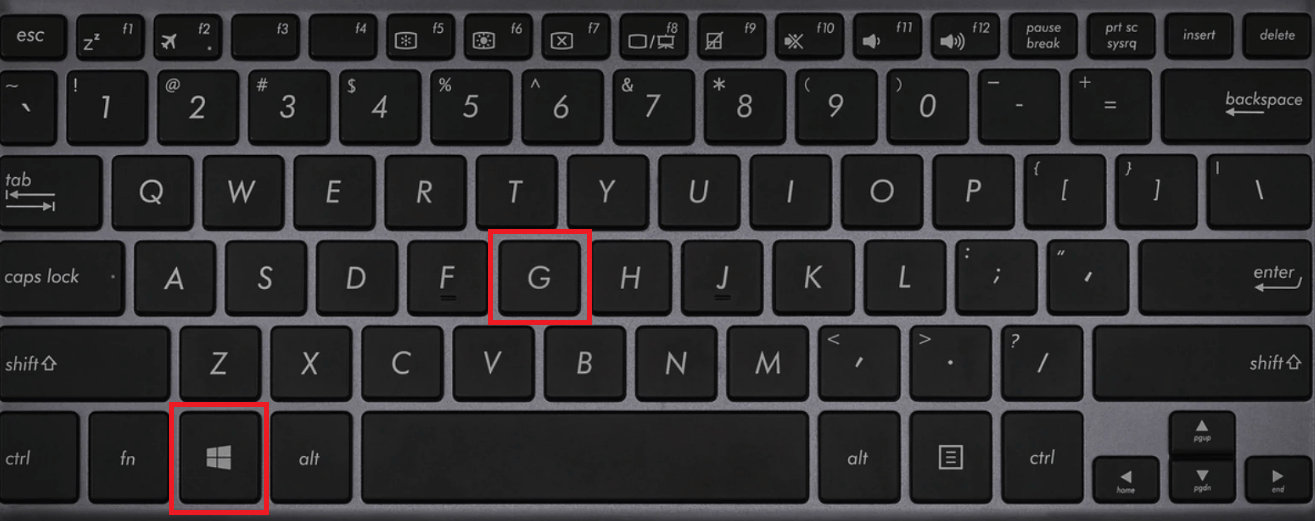
- To open upward the Game Bar overlay printing the Windows Key + G (windows key M). Earlier you press this make sure your active window is the verbal window/screen yous want to capture

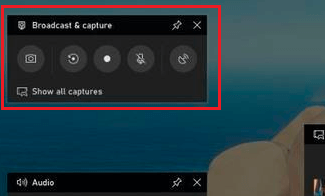
- In the meridian right corner of the screen, you will notice a window labeled Broadcast & capture. In gild to have the screenshot, click on the Camera icon. This will save the screenshot as a PNG file and saves it in "C:\Users\Username\Videos\Captures." This will exist a full-screen image.
The game bar can help you record the screen in Windows 10.
TheGame Bar is automatically installed in Windows 10. (If you can't detect it for some reason, you can download it here.) Notwithstanding, if you haven't used it however, information technology might be worth checking to make sure information technology'due south working — especially before you try to record videos. To do this
- Press Windows Key + G (Windows Fundamental Thousand) on your keyboard. This should open up up the Game Bar. If information technology doesn't, here's how to enable it:
- Go to the Start Menu
- Click on the cog icon to open up Settings
- Click on "Gaming"
- Make sure the switch at the top labeled "Record game clips, screenshots, and circulate using Game bar" is toggled to On
Note: The folio you've opened also has keyboard shortcuts for Game Bar commands such equally opening the Game Bar, taking a screenshot, and starting and stopping a PC screen recording. You tin can Likewise come up with your own shortcuts for these commands and enter them here if you wish.
Now, with the game bar enabled, you can brainstorm your screen recording and record game clips of your favorite game.
How to Record your Screen with the Game Bar
Go along in mind that you lot can only use the Game Bar to perform a screen tape of simply 1 application or active window at a time, which is usually the last window you clicked into. Also, y'all can't switch to recording another window afterward you start recording. The game bar won't besides let you record your whole screen, so you tin can't record your Desktop or File Explorer or a few other apps, such as Maps. Nosotros recommend that you first experiment ahead of time if possible.
Here are the steps to undertake the screen tape and record game clips with the game bar (using x box Game Bar):
- Open the Windows application you want to record. You may need to close or minimize other windows or apps to avoid accidentally recording the incorrect i. Information technology may also help to make sure that any sound y'all don't want in the recording is off, even if it's from a different app or window. The screen recorder record all of the audio playing beyond applications on the device.
Read: How To Fix Discord Screen Share Audio Not Working (2022)
- Press the Windows key + G. This will open up upwardly Xbox Game Bar
- Click on the microphone button to enable external audio recording. This will permit you to add together commentary or do a voiceover. (You'll even so be recording internal audio.)
- Click on the Record push (the ane with a dot in it) to starting time recording. Alternatively, simply press Windows + Alt + R to start recording without going into the Game Bar.
- Either way, y'all'll go a small pop-up bar with a timer and two recording controls.
- Click on the microphone button to switch your external mic on and off (your internal mic volition however be on) and complete your recording.
- Click on the stop button or printing Windows + Alt + R to finish recording the screen when y'all're done. The screen record will save on your PC.
- A notification will pop up on the notification panel at the lower right corner, saying "Game prune recorded." If you click on that notification you'll open the "Captures" binder or the screenshots folder in File Explorer.
- An alternative to finding your recording is through File Explorer. Become to "This PC"> "Videos"> "Captures" or the screenshots folder.
Read here if you lot need further information near How to record your Windows PC screen using Xbox Game Bar.
Method 7: Apply 3rd party app to capture screenshots on PC
If the Windows provided methods can't help you capture the screenshots well, you can resort to tertiary party apps. Tertiary party integrations are an integral feature for screenshot tools in Windows. They add together farther functionality to your screen capture such as capturing scrolling screen also as easy sharing between various work productivity apps. The print screen software from third parties includes various integrations with prototype editing [image editor], project management, file sharing, and messaging tools to maximize tool efficiency and worker productivity.
Some of the 3rd party screen capture tools include:
- ShareX
- PicPick
- ScreenPresso
- Snagit
- Apowersoft Screen Capture Pro
- Droplr
- CloudApp
- Screencast-O-Matic
In this article, we detail how to employ 3rd party apps to capture scrolling screens.
Watch the video: How to screen shot on Windows 10 Video
Read: How to Get Started With Windows 10 including taking screenshots on Windows 10
How to screen shot on Windows xi Guide
At that place'due south more than than one way to have a screengrab in Windows 11. Hither are four unlike means to show you lothow to screen shot on Windows 11.
Method 1. Take a screenshot of the entire screen with the Prt Sc key
Similar in Windows 10, in Windows xi you'll use the PrtSc key on an active window.
- Tap on the PrtSc key
- The screenshot will be saved to your clipboard simply you won't receive any indication the screenshot has successfully been taken.
- To view the full-screen screenshot, use Ctrl-Five to paste it into an application like Microsoft Paint or Microsoft Word, or even into the trunk of an email.
Method two. Use Windows key + PrtSc key to take a full screen screenshot and save it to your reckoner
- Similar to the PrtSc key windows fundamental, hitting the Windows central + Print Scren keys will grab a screenshot of your entire desktop but only on an active window.
- But it'll also relieve the screenshot to a folder on your computer.
- If you hit the keys correctly, your whole screen will flash, indicating the screenshot has been taken and automatically saved.
- You lot tin can find all of your full-screen screenshots in Pictures -> Screenshots.
Method 3. Use the Snip & Sketch Tool to accept a screenshot of only part of the screen
Perhaps you want to take simply a department or an active window of the PC'south screenshot. In this example, Windows xi gives yous the option to take only a fractional screenshot using the snip and sketch tool:
- Hit windows keys Win + Shift + S, your screen will flash and a small Snipping Tool carte will appear at the top of the screen.
- This screen volition let you lot to exercise the following (from left to right):
- Rectangular screen Snip: Draw a box around what you want to capture
- Freeform Snip: Draw any shape around what you want to capture.
- Window Snip: Choose a window to capture.
- Total-screen Snip: Capture your entire screen (aforementioned thing as PrtScr).
- One time the screenshot'southward taken, it'll be saved to your clipboard, as with the Prt Scr key choice.
- You tin can then paste information technology elsewhere to look at it.
- However, if yous click the Snipping Tool preview that appears at the bottom of the screen, yous'll find options to edit the screenshot (crop, rotate, and more than) and save information technology to your desktop.
Method 4. Utilize the Snipping Tool to take delayed screenshots
The Snipping Tool comes built into Windows 11 but similar it was IN Windows Vista, Windows 7, Windows 8, and Windows 10. Information technology is the aforementioned tool used in the Snip and Sketch tool, except with a few tiny additions. To use it,
- Type in Snipping Tool in the Search characteristic and open the application to have a computer screenshot.
- If you click on New y'all'll open the mini Snipping Tool carte where you tin can then choose between several different snips.
- However, with this full-version of the Snipping Tool, y'all can choose whatsoever of the four snipping options (rectangular, freeform, window, and fullscreen) and then choose a filibuster option.
- You lot tin choose between a 3-, 5- and 10-second delay in the sketch window.
- This will give yous a scrap of time to set up whatsoever it is you lot're attempting to screenshot and might make information technology easier than taking the shot manually.
- To take the delayed screenshot, simply hitting Win-Shift-Southward, which will and then be copied to your clipboard. You tin also click on the screenshot preview that appears to make any edits or salvage it to your computer as a JPEG, PNG, or other.
Final Word
And that does it! Yous now take 5 methods at your disposal showing you how to screenshot on Windows x. Do y'all have a Mac and want to take a mac screenshot? Check out our commodity on how to take screenshot on Mair conditioning.
If you lot desire to find out more tricks on how to utilize your Windows at its maximum capacity, join our newsletter today! You fifty-fifty get a ten% discount lawmaking on our store! :)Would you similar to receive promotions, deals, and discounts to go our products for the best cost? Don't forget to subscribe to our newsletter by entering your email address beneath! Receive the latest technology news in your inbox and exist the beginning to read our tips to become more productive.
See Also:
>How to Take a Screenshot on Mac
> How to Use Snip & Sketch to Capture and Edit Screenshots in Windows 10
> How to Capture Scrolling Screenshot in Windows
Source: https://softwarekeep.com/help-center/how-to-take-screenshots-on-windows
Posted by: goyetteoundiciat.blogspot.com
0 Response to "How To Screenshot A Certain Area On Windows 10"
Post a Comment